Have
the users go to the EA option on the device (8700). With this option open,
have the user hold down the ALT key type the following "CNFG". It
takes the user into another area. Scroll down to the "Wireless
Sync" option and change the value from "Yes" to
"No" and save it. Repeat the above again and set the
"Wireless Sync" to "Yes". This performs a simulated EA
again and replaces all the service books with updated ones.
Set
all BES NT services to manual
Reboot BES, ?( therefore BES wont start.
CDO is in either exhcnage BIN directory of system32 dir, if you can;t find
do a windows search for CDO.dll
type regsvr32 -u cdo.dll from a run command
rename CDO to CDOold.DLL
Then copy new CDO from your exchange server to relivant dir
type regsvr32 cdo.dll (this will register the new DLL)
change servcies back to auto and restart, thats it your done
gone through this process lots of times
To
get this to appear vodafone support have to dual provision it and vodafone
live needs to be enabled.
Message Tracking on BES
Get the Refid of the message in question. Open the message on
Handheld, press ALT and type VIEW. Refid will be listed If
refId is positive, it means the message was sent from HH to BES, if negative
the message was sent from BES to HH .
Then use Messageflow.exe to track the message flow
MessageFlow.exe -p E -u Usersemail@address.com -L "O:\Program
Files\Research In Motion\BlackBerry Enterprise Server\Logs\subfolder"
1.Install JL_Cmder_v1.8.3.zip and
JL_Cmder_v1.8.3_Installer.zip and wipe device
2.Install the desktop first. Then install
the OS for the HH. Plug the BB back in, and it should recognize it and ask
you if you want to install the OS. You need both the DM and the OS to make
this work.
Wireless Reconcile & On Conflicts missing
Problem: I discovered that all Blackberry devices have had Email
Reconciliation settings reset to: Delete on: Handheld & Mailbox. This
also removes the options for Wireless Reconcile and On Conflicts.
Solutions: Delete the DESKTOP(CMIME) service book and
resent the Service Books to devices and the ‘Wireless Reconcile’ and ‘On
Conflicts’ menu items reappear.Alternatively delete
all DESKTOP service Books and resend them then it should be fine.
The following entries appear in the Mail
Agent (MAGT) logs:
[20528] (09/29 10:23:29):{0x56C}
{user@domain.com} ConstructPIMFolder - Failed to open the contact folder
for user (0x8004010f)
[40800] (09/29 10:26:26):{0x258C}
{user@domain.com} Starting Address Book rescan
[40879] (09/29 10:26:26):{0x258C}
{user@domain.com} No folders exist, rescan complete (type=1)
OR
[20530] (09/29 10:23:29):{0x56C}
{user@domain.com} ConstructPIMFolder - Failed to open the memo folder for
user (0x8004010f) [40856] (09/29 10:26:26):{0x56C} {user@domain.com}
Starting Memos rescan
[40879] (09/29 10:26:26):{0x56C}
{user@domain.com} No folders exist, rescan complete (type=3)
Note: This issue may also apply to the
synchronization of contacts, tasks, or memos over the wireless network.
Reason
The following values do not match when
viewing with a Messaging Application Programming Interface (MAPI) editor,
such as Microsoft Foundations Classes MAPI (MFCMAPI), at the Root
Container:
These values do not match their
corresponding PR_ENTRYID at the Top of Information Store level.
Troubleshooting
Complete the following steps to determine
if the problem is a result of PR_ENTRYID values that do not match:
On the BlackBerry user's computer, open
the MAPI Editor (MFCMAPI).
Click Session and select Logon and
Display Store Table.
If there are multiple MAPI profiles,
select the BlackBerry smartphone user's mailbox from the list and click OK.
If there is only one MAPI profile, go to step 5.
Select Root Container and locate the
PR_IPM_CONTACT_FOLDER_ ENTRYID or PR_IPM_NOTE_ENTRYID property.
Double-click PR_IPM_CONTACT_FOLDER_
ENTRYID or PR_IPM_NOTE_ENTRYID and note the binary value.
Expand Root Container.
Expand Top of Information Store.
Select Contacts or Notes and locate the
PR_ENTRYID.
Note: The PR_ENTRYID is alternatively
referred to as PR_ENTRYID, PR_MEMBER_ENTRYID.
Double-click the PR_ENTRYID and note the
binary value.
Compare
the binary values found in steps 6 and 10. If these values do not match,
the BlackBerry Enterprise Server will be unable to synchronize contacts,
tasks, or memos, because the value at the Root Container is used to locate
the entry in the
A BlackBerry smartphone (with tethered
modem capability) can be used as an external modem to connect a laptop
computer to the Internet. When attempting to use a BlackBerry smartphone
for this purpose, some support is available.
Research In Motion (RIM) supports the
Standard Modem Driver. This driver is installed with BlackBerry® Desktop
Manager. After installing BlackBerry Desktop Manager, the modem should
appear in Windows® Device Manager. Use the steps below to check the Device
Manager:
1.Right-click the My Computer icon on the desktop, or go to the Start
button and right-click My Computer from the Start menu.
2.Click Properties from the menu that appears.
3.Go to the Hardware tab in the System Properties window.
4.Click the Device Manager button. This will open the Device Manager.
If the Standard Modem Driver is not shown
in the Windows Device Manager, see KB04129
To
connect a computer to the Internet using a GPRS, EDGE or UMTS BlackBerry
smartphone as a tethered modem, see KB05196 or see the steps below
To set up a tethered modem, complete the
following tasks:
Task
1
Install
BlackBerry Desktop Software 4.1 or later on the computer.
When you install BlackBerry Desktop
Software, the drivers that allow the BlackBerry smartphone to communicate
through the Universal Serial Bus (USB) port and virtual COM port are
installed. The Standard Modem, which is used by dial-up networking, is also
installed.
Note: If upgrading your BlackBerry
Desktop Software from version 4.0 to 4.1, the required Virtual COM Port and
Standard Modem might be removed during the upgrade process. If this is the
case, re-install the BlackBerry Desktop Software 4.1 or later and choose
the Repair option to re-install these components.
Note: If you do not know your Internet APN, or
if you do not have an Internet APN, contact your service provider.
Click OK.
In the Phone and Modem Options window,
click OK.
Task
3
To
configure dial-up networking, complete the procedure that is appropriate to
the operating system you are using:
Microsoft Windows Vista
Click Start > Control Panel >
Hardware and Sound > Phone and Modem Options
If you are opening Phone and Modem
Options for the first time, a dialog box displays prompting you to enter an
area code and access codes.
Windows XP operating system
Click Start > Settings > Network
Connections.
Double-click New Connection Wizard. The New
Connection Wizard opens.
Click Next.
Select the Connect to the Internet
option. Click Next.
Select Set up my connection manually.
Click Next.
Select Connect using a dial-up modem.
Click Next.
If the Select a Device screen appears,
select the Modem - Standard Modem check box. Click Next.
In the ISP Name field, type a name for
your connection. Click Next.
In the Phone number field, type *99#.
Click Next.
Indicate which users will have access to
the connection. Click Next.
Type the user name and password provided
by your service provider. Click Next.
Click Finish.
In the Connect window, click Properties.
In the Properties window, verify that
Modem - Standard Modem appears beneath the Connect using heading, and then
click Configure.
In the Modem Configuration window, clear
the Enable hardware flow control check box and make sure none of the other
check boxes are selected. Click OK. In the Properties window, click OK.
Microsoft Windows 2000 operating system
Click Start > Settings > Control
Panel.
Double-click Network and Dial-up
Connections.
Note: The following is applicable for
T-Mobile customers only:
Under the networking tab in the
properties window for the dial-up connection, clear the Enable LCP
Extensions check box, as well as every other box beneath the PPP window.
Double-click Make New Connection. The
Network Connection Wizard opens.
Click Next.
Choose Dial-up to private network. Click
Next.
In the Phone number field, type *99#.
Click Next.
Indicate which users will have access to
the connection. Click Next.
Type a name for your connection. Click
Finish.
In the Connect window, click Properties.
In the Properties window, verify that
Modem - Standard Modem is selected, then click Configure.
In the Modem Configuration window, clear
the Enable hardware flow control check box and make sure none of the other
check boxes are selected. Click OK.
Note: During this procedure, do not operate
the BlackBerry® Browser or any third-party applications on the BlackBerry
smartphone. An active data session may interfere with the modem connection.
Also, make sure an ethernet connection is not active at the same time.
1.Connect the BlackBerry smartphone to the computer.
2.Open BlackBerry Desktop Manager.
3.Click Start > Settings > Network Connections
> <name of your new connection>.
4.Type the user name and password provided by your
service provider.
5.Click Dial.
Or
to connect a computer to the Internet using a CDMA or EVDO BlackBerry
smartphone as a tethered modem, then see KB04664.
Standard
Modem device not installed with BlackBerry Desktop Software 4.0 Service
Pack 1
Doc
ID : KB04129
BlackBerry® Desktop Software 4.0 Service
Pack 1
Problem
The Standard Modem device, used for
internet protocol (IP) modem functionality, does not appear in Microsoft®
Windows® Device Manager after installing BlackBerry Desktop Software 4.0
Service Pack 1. Normally, the Standard Modem device is created when the
BlackBerry Desktop Software is installed, as shown below.
Resolution
1
Download BlackBerry Desktop Software 4.0
Service Pack 1 or later.
Install the software on your computer.
After installing the BlackBerry Desktop
Software, verify that the Standard Modem device is installed.
Resolution
2
In rare circumstances, the modem driver
mdmgen.inf might not be included in the installation of your Microsoft
Windows operating system. This file is required for a successful
installation of the Standard Modem device. To resolve this issue, check
KB03981 or the steps are written below
The mdmgen.inf file is missing from the
INF folder on your computer. This file contains driver definitions for the
modem. It is required to create the Standard Modem device.
The
BES3.6 and earlier polls the users' mail server after X secs intervals.
When
you increase the wait period (interval) before the BES polls the mail
server again, each enabled user has received more messages in their Inbox
pending redirection. The BES service has slightly more messages per user to
scan than it would if at the optimized 20secs interval. Which by the way is
arrived by, as was explained by a developer, a mathematical principle
called "system optimization". Using 2nd/3rd order differentials.
The
BES service also has to route these messages and check for retrys for
devices not responding (similar to what the domino mail router does).
Remember that each user is allowed only 5 messages on the wireless network
and the queue is monitored by the BES service.
So
if a user gets 5messages/sec in a min that user would have 300messages.
Therefore, at 20sec intervals that user would have 100messages. At 30sec
intervals that same user would now have 150messages. That 10secs has
resulted in an extra 50messages.
The
wireless network will only accept 5messages/user (this is to prevent
spamming on the network). Messages are sequentially tagged and handled by
the BES service. So later messages will never arrive before earlier ones.
It's technically impossible to route 150messages as fast as
100messages...given the randomness of size differentials. Mail routing is a
time dependent task.
How
long does a scan take...depends on the amt users + amt new docs/user (in
the Inbox) + no filters/user.
Hence
the reason a heavy mail user would tend to notice delays more frequently
than a light user (especially if they have dual access to email client).
If
you add network latency issues to the mix, it makes it a bit worse.
Email sent from a
handheld
1.
Message is sent from handheld: The user sends a message from the handheld.
On the handheld, the message is assigned the RefId. If the message is a
meeting invitation or calendar item, the handheld appends the calendar
information to the message.
2.
Compresses and encrypts: The handheld compresses and encrypts the entire
message.
3.
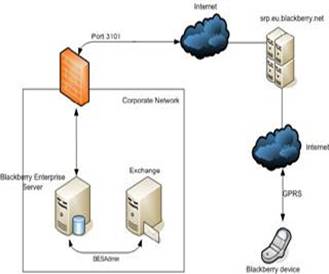
Sends to the BlackBerry Enterprise Server: The message is sent to port 3101
over the wireless network to the BlackBerry Enterprise Server.
4.
Decrypts and decompresses: The BlackBerry Dispatcher uses the user
encryption key to decrypt and decompress the message. If the message cannot
be decrypted using the unique encryption key, the BlackBerry Enterprise
Server ignores the message and sends an error to the handheld.
5.
Delivers to mailbox: The Messaging Agent places the message in the user's
Microsoft Exchange mailbox.
6.
Copied in Sent folder: The Messaging Agent places a copy of the message in
the Sent Items folder in the desktop email program. This step does not take
place if the Don't save a copy to the Sent Items folder option is enabled
in the user settings and that setting is permitted on the BlackBerry
Enterprise Server.
7.
Routes to recipients: The Microsoft Exchange Server routes the message to
the recipients. As a result, a message that is sent from the handheld is
the same as a message that is sent from the desktop; messages originate
from the user corporate email address, and, if necessary, a copy is placed
in the Sent Items folder.
SRP
Identifier + SRP Auth Key + BES Admin Account + BES Virtual Server name
keep
all of those the same and you won't have any issues. you can do a fresh
install, upgrade to SP5, etc. without having to worry about users having to
recradle. the database contains IT Policy information, so you will want to
keep that, most likely.
IP
address and server name changes won't affect it, so long as you keep the
BES virtual server as the same name.. . . . . but it would be smart part to
add a disclaimer stating something along the lines of 'if you do experience
any issues, recradle your handheld'
All
the users are in the BES admin mailbox. If you create an identical BES
server with SAME SRP name and ID using the same BES admin mailbox and fire
it up, It will populate all the users. You could even do it with a new
database except you would loose any IT policies you may have. The database
in 3.6 is mostly used for management and historical information.
Here
was my DR scenario for 3.6:
We
had a standby server with BES installed using same SRP, BESADMIN mailbox
and keys.
Don't
start the services.
If
the main server goes down, we just start services on the failover box and
mail continues to flow, no need for anyone to cradle or anything.
The
only difference in my scenario is I have a shared SQL database but you
could have seperate MSDE databases on each server and if you wanted the
Database data from the original server and where backing it up, you could
just attach it to your failover server
OPTION 2
With
BES 3.6, the user list remains intact and pulls from the BES Admin mailbox,
I believe. Ask yourself one question - "Do we enable the use IT Policy
on the BES?" If the answer is "No", then you do not even
have to worry about backing your database up or restoring it in the event
of a failure. In 3.6, it stores the IT Policy configuration and your
License Keys.
The
keys to a cutover would be SRP Identifier, SRP Authentication Key, BES
Admin mailbox/account, BES Instance name (Virtual Server name). That will
be all you need to bring up the BES and have no real interruption for the
users (on any handheld OS version). Make sure you have all 4 items in
check, though. So if your BES Instance name is PRODBES11, then make sure
you put it down as PRODBES11 on the new server (by default, I believe it
tries to install as SERVERNAME1, so set that portion manually).
If
you do use IT Policy for your users, then you will need to shut down the MSDE/SQL
services on the old BES and be sure to copy the MDF/LDF files to the new
BES. I wouldn't worry about replicating the database unless you make
changes to the IT Policy. You could alternatively recreate the policy on
the new BES by hand if its not complex. Or you could just export the values
and import (I believe these are on this forum somewhere).
One
way we do it is to have an image (Ghost) of the BES server. I have the DB
backed up nightly. If the server were to "crash & burn" we
could get the same hardware, re-image it, and restore the DB from backup. I
have to export the user list every so often but, this way it is simplistic
The Knife
Edge Cutover Process for Blackberry Enterprise Server for Disaster
Recovery Purpose. The following describes how to effectively perform a
cutover from a Production to the DR box in the event of DB / Hardware
Failure.
With
any application upgrade, its always best to have a clean install. However,
there is an upgrade path you can take that is painless as well.
If
you do not use IT Policy with your corporation, then I'd suggest
uninstalling and doing a clean upgrade. Its less of a headache and just easier,
so long as you remember to export your user list (or atleast write down the
users' names) and keep the SRP ID+SRP Auth Key+BES mailbox/svc acct+BES
Virtual Server name the same on the new installation.
Here are the basic instructions on how to install the BES manager on
a workstation.
1. Run setup.exe fromBES
install files
2. In the "Setup Type" section: Select "Blackberry
Manager" from the list of components to install
3. The next screen will show you a list of prereqs and will state
whether you meet them or if there are some it needs to install or some that
you need to install.It should be
noted here that one of these prereqs is the mapi32.dll, but if you have
Outlook installed, that is sufficient and you don't need to install
Exchange System Manager.
5. Next is the Database Settings screen. It will automatically
choose "Remote" and default the DB name to "BESMgmt",
Port 1433. Enter the name of the server where the BB database resides.
Choose the Authentication type: Windows or SQL
6. Installation complete and reboot
7. If it doesn't open automatically on reboot, Open the Blackberry
manager from Start -> Programs -> Blackberry Enterprise Server ->
Blackberry Manager. You will immediately get an error about the MApi
profile not existing. Click OK.
8. In the profile screen, enter the Exchange server name and the
blackberry mailbox name. Click Ok.
9. The Blackberry manager will
then open and you now have as much access as you have assigned that for the
currently logged in user account.
1. Open a command
prompt from the machine running MSDE.
2. Type osql -E and
press enter; 1> is displayed.
3. Type alter
database besmgmt modify file (name=besmgmt, maxsize=2gb) and press enter;
2> is displayed.
4. Type go and press
enter; 1> is displayed.
5. Type exit and
press enter to exit out of osql command.
6. Restart the
Dispatcher service.
the
error you will get before doing this process is:
"Failed
to add user to BES serevr. Please ensure that teh exchange server that
hosts the BES admin mailbox and users mailbox is running and u have
sufficient permissions and no network issues"
Need
to totally rebuild BES 3.6 server due to problems outside of BES. How to
backup all the database, rebuild and reattach all the handhelds afterwards
*
Optionally, a existing instance of SQL Server 2000 can be used. However,
please note that Mixed-mode authentication needs to be enabled, and that
the sa account password may be different from that used on a BES SQL
database.
*
Installation sources for SQL Server 2000 SP3 (Unless an existing instance
is used).
*
A recent backup of the BESMgmt data (BESMgmt_db_xxxxxxxxxxxx.BAK) and transaction
log (BESMgmt_tlog_xxxxxxxxxxxx.TRN).
Installing
Microsoft SQL Server on the server computer
Note:
if there is already a suitable SQL Server that can be used as the BES SQL
Server, this stage can be omitted. A suitable server will need to have SQL Server
SP3 applied and have Mixed-Mode authentication enabled.
1. Install Microsoft
SQL Server on the machine hosting the server with the following options,
accepting the defaults otherwise. However, depending on the server build,
it may be appropriate to locate the data and log files on separate volumes.
*
SQL Server (Mixed-Mode) Authentication
*
The sa password should be ***********
*
Service account should be domain\BESAdmin account
2. Install SQL
Server Service Pack 3 on the server, accepting the defaults.
3. Check that SQL
Server can be accessed remotely by creating a connection in Enterprise
Manager on a remote PC, using the sa login details.
Restoring
the BESMgmt database from a backup
The following procedure can be carried out either on the server itself, or
from a remote machine, using the Enterprise Manager and Query Analyser
software packages.
1. Copy the most
recent .BAK and .TRN backup files to a location on the server that is
hosting the SQL Server database.
2. Determine the
location of the Data folder for SQL Server. It is normally contained in the
MSSQL folder which is installed by default at C:\Program Files\Microsoft
SQL Server\MSSQL\Data, but is often moved to another drive, e.g.
D:\MSSQL\Data.
3. Start the Query
Analyser application (part of the SQL Server Client Tools) and connect to
the current SQL Server. Log in with the sa account.
4. Enter the SQL
script from Appendix A into the right-hand pane of Query Analyser.
5. Replace the
placeholders (identified by <>) with the correct values for the
server in question, as detailed in Appendix A.
6. Click the button
on the toolbar to start the script running. It may take several seconds to
run.
7. When completed,
it should return results like the following:
Processed
6936 pages for database 'BESMgmt', file 'BESMgmt' on file 1.
Processed
1 pages for database 'BESMgmt', file 'BESMgmtLog' on file 1.
8. If the script
failed, double-check the file paths and the location of the Data folder and
run the script again. If the script still fails, try the next most recent
backup files.
These
are the steps that you will need to do to re-establish the connection
between the blackberry and the mailbox again
1.Remove Blackberry from the cradle
2.Reset it the blackberry by removing the
battery case and using a paper clip-> press RESET notch or by pressing
ALT+Right SHIFT+BACKSPACE/SPACEBAR together
3.Reboot your machine/workstation
4.Log back onto the network and outlook
5.Insert BB into cradle- let it connect fine and synchronise
6.unplug the BB device from the cradle
7.send Test message to yourself from
outlook (desktop) -> message should appear in BB device. ->sometimes
it takes about 5-10 mins for messages to appear.
At
this point if you receive the message on the blackberry, the test is
completed successfully.
To check where the registered CDO.dll file is on BES
Server Goto Start > Run and
type regedit. Click OK.
On the HKEY_CLASSES_ROOT
folder to expand the folder and verify you have the following regkey: HKEY_CLASSES_ROOT\CLSID\{3FA7DEB3-6438-101B-ACC1-00AA00423326} If you have this registry key, the CDO.dll file is registered on the
BlackBerry Enterprise Server.
To check the location for the registered CDO.dll file Double-click the folder for the registry key.
Click the InprocServer32 folder.
Check the path beside (Default), this is the path of the registered
CDO.dll file.
Note:This allows
the BlackBerry Enterprise Server administration account to access the
local computer and run the BlackBerry Enterprise Server software as a
Microsoft® Windows® Service.
1.Click Start > Administrative Tools> Local
Security Policy.
If the computer is a domain controller, click Start >
Administrative Tools> Domain Controller Security Policy.
2.In the Local Securities window, click Local
Policies > User Rights Assignment.
3.Do one of the following:
oFor Microsoft® Windows Server® 2000, double-click Log
on Locally.
oFor Microsoft Windows Server® 2003, double-click Allow
Log on Locally.
4.Click Add User or Group.
5.Select the BlackBerry Enterprise Server
administration account name and click Add.
6.Click OK.
7.In the Local Security Settings window,
double-click Log On As a Service.
8.Click Add User and select the BlackBerry
Enterprise Server administration account.
9.Click OK.
Task 3
To assign Microsoft Exchange Server permissions at
the Administrative Group level, complete the following steps for your environment:
Note:This
allows a system administrator to manage
BlackBerry smartphone users and groups.
On Microsoft Exchange 2000/2003
1.Go to Start > Programs > Microsoft
Exchange > System Manager.
2.Select Administrative Groups.
3.Right-click First Administrative Group
and select Delegate Control.
4.In the Exchange Administration Delegation Wizard,
click Next, and then click Add.
5.Click Browse and
select the BlackBerry Enterprise Server administration account.
6.Click OK.
7.In the Role drop-down list of the Delegate Control
window, select Exchange View Only Administrator.
8.Click OK to add the BlackBerry
Enterprise Server administration account to the Users and Groups list.
9.Click Next, and then click Finish.
On Microsoft Exchange
2007
To set an Exchange
View Only Administrator role
1.Open Windows PowerShell, and then open a command
prompt window.
2.In the command prompt window, type the
following line and press ENTER:
where <BESAdmin> is the name of the BlackBerry
Enterprise Server administration account.
To check an Exchange View-Only Administrator role
1.Open Windows PowerShell, and then open a command
prompt window.
2.At the command prompt window, type the
following line and press ENTER:
get-exchangeadministrator | Format-List
Verify that the BlackBerry Enterprise Server administration
account has a role of ViewOnlyAdmin.
Task 4
To assign Microsoft Exchange Server permissions at
the Microsoft Exchange Server level, complete the following steps:
On Microsoft Exchange
2000/2003
1.Go to Start > Programs > Microsoft
Exchange > System Manager.
2.Select Administrative Groups > First
Administrative Group > Servers.
3.Right-click the Microsoft Exchange Server name and
select Properties.
4.On the Security tab, select the BlackBerry Enterprise
Server administration account.
5.From the Permissions list, select the
following permissions:
oAdminister
Information Store
oSend As
oReceive
As
6.Click the Advanced button and ensure that
the option Select the Allow inheritable permissions from parent to
propagate to this object and all child objects is checked.
Note: Repeat the above steps for
each Microsoft Exchange Server within the routing group that will be
hosting mailboxes for BlackBerry smartphone users who have accounts on a
BlackBerry Enterprise Server.
On Microsoft Exchange
2007
To set Send As, Receive
As, and AdministerInformation Store permissions
1.Open Windows PowerShell, and then open a command
prompt window.
2.At the command prompt window, type the
following line, and then press ENTER:
where Exchange 2007 is the name of the Microsoft
Exchange 2007 Server and <BESAdmin> is the name of the
BlackBerry Enterprise Server administration account.
To check the Send As, Receive
As, and Administer Information Store permissions
1.Open Windows PowerShell, and then open a command prompt
window.
2.At a command prompt, type the following line,
and then press ENTER:
On Microsoft Exchange 5.5
The BlackBerry Enterprise Server administration account requires
the Service Account Admin permissions on the Site container
and Configuration container.
To grant the Send As permission on a single
account for all BlackBerry device users in a Microsoft® Active
Directory® domain or container, complete
the following steps:
2.From the View menu, select the Advanced
Features option.
Note: If this option is not
selected, the Security page will not be visible for domain and
container objects.
3.Right-click the appropriate domain or container
and click Properties.
4.On the Security tab, click Advanced.
5.If the BlackBerry Enterprise Server administration
account that requires the Send As permission is not listed,
click Add and select the BlackBerry Enterprise Server administration
account name.
7.Double-click the BlackBerry Enterprise Server
administration account name.
8.In the Applies Onto list, select User
Objects.
9.Select the Send As check box.
10.Click Apply, and then click OK.
11.Close the Properties window, and then close
Active Directory Users and Computers.
Note:For
additional methods of assigning the Send As permission, search for
article 912918 in
the Microsoft Support
Knowledge Base.
Task 6
To assign the required permissions for managing
the BlackBerry Configuration Database, see Task 2 inKB03112.
For additional information on
the permissions that are required to manage the BlackBerry Configuration Database,
see KB03633.
Additional Information
Microsoft Exchange 2007 is
supported in BlackBerry Enterprise Server software version 4.1 Service Pack
3 and later.
If you have a Microsoft SQL Server,
assign the Server roles by completing the following steps:
Note:If you are
using MSDE, skip this step.
1.In the
SQL Enterprise Manager, go to Microsoft SQL Servers/SQL Server
Group/<SQL_server_name>.
2.Expand the
Microsoft SQL Server and expand security.
3.Right-click
Logins and click New Login.
4.On the
General tab, click the button next to the Name field.
5.Select
the new service account name from the Names list, click Add, and click OK.
6.From the
Server Roles tab, select Server Administrators and Database Creators from
the Server Role list.
Note: If you are running BlackBerry Enterprise Server
software version 4.1 or later, add the System Administrators role to add
BlackBerry smartphone users in a role-based administration environment. For
instructions, see the BlackBerry Enterprise Server for Microsoft Exchange:
System Administration Guide.